Knowledge Base › CHAX 11 › Data and multi-PC
Your data and multiple PCs
Back up and restore your database, share it with Host mode, and move to a new computer.
Windows and macOS4 guides

Knowledge Base › CHAX 11 › Data and multi-PC
Back up and restore your database, share it with Host mode, and move to a new computer.
Learn where CHAX keeps your data and when it backs up on its own, then make, check and export a backup yourself.
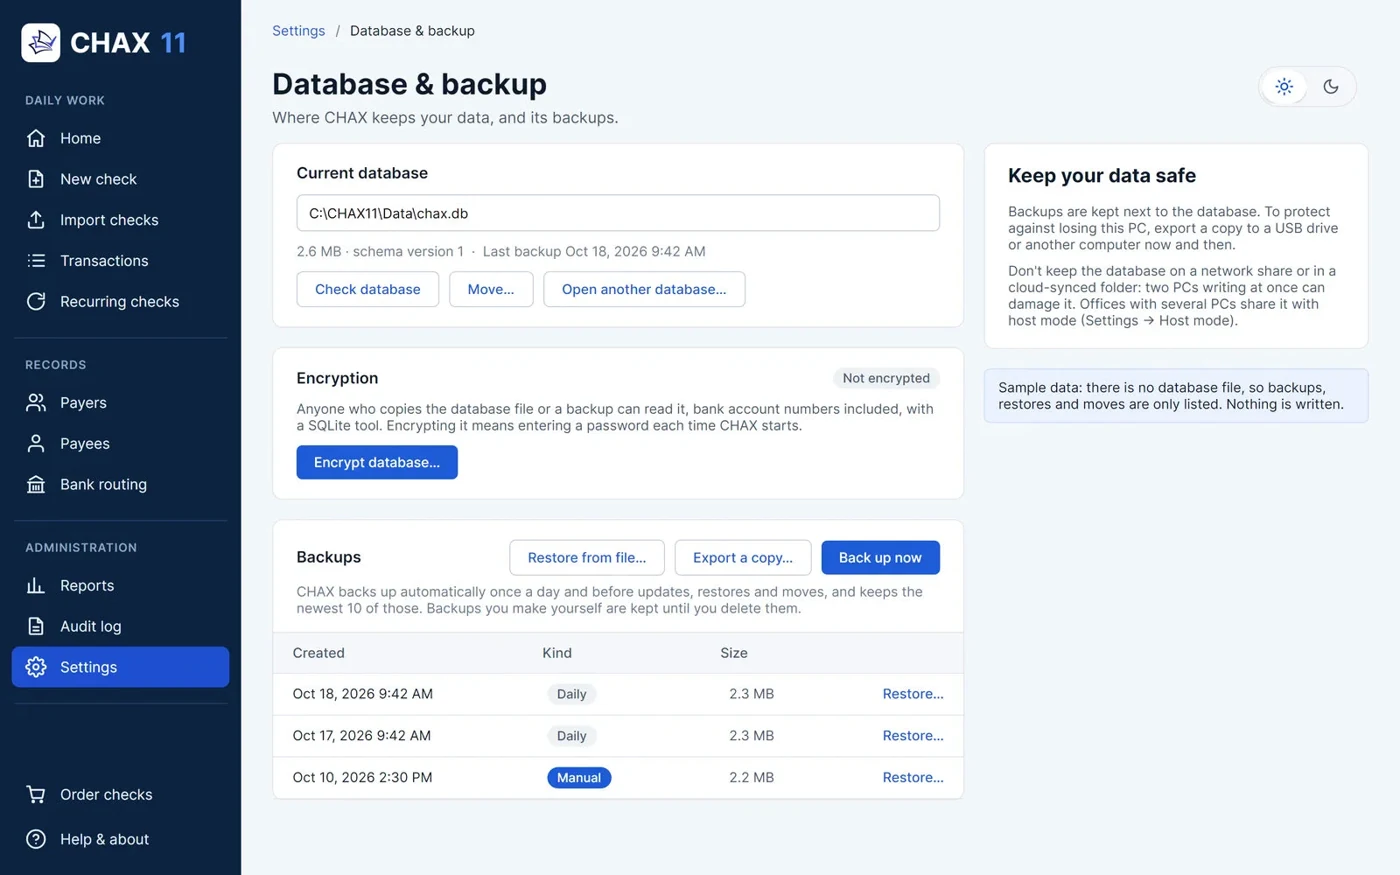
In the sidebar, open Settings and choose Database & backup. Power users and admins see this page. Moving the database or opening another one takes an admin.
CHAX 11 has one database per company: a single SQLite file holding your payers, payees, checks, users, audit log and company settings.
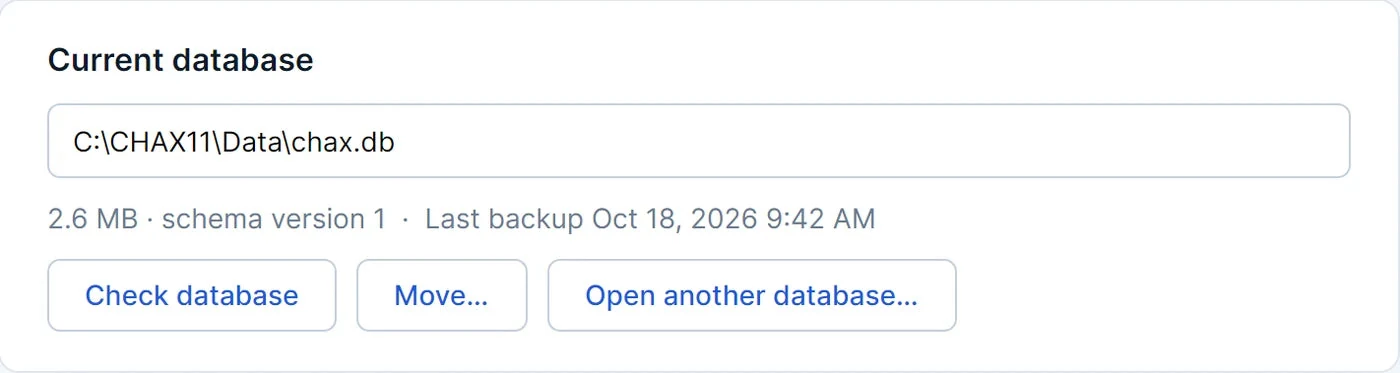
The Current database card gives the file’s full path, its size, its schema version and the time of the last backup. Unless you chose another place in first-run setup, you’ll find the file here:
| System | Database file |
|---|---|
| Windows | %LocalAppData%\CHAX\chax.db |
| macOS | ~/Library/Application Support/CHAX/chax.db |
You can also find the path under Help & about › About › Database.
CHAX makes these backups on its own:
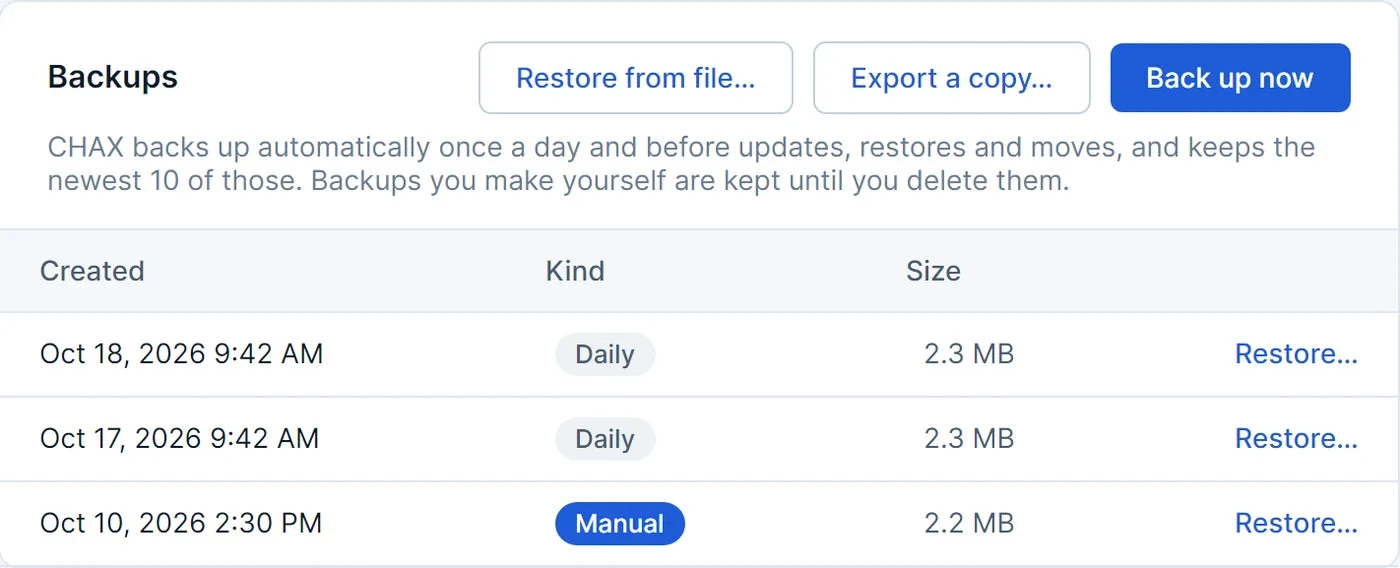
The newest 10 automatic backups are kept, and older ones are deleted. Backups you make yourself are never deleted automatically.
In the Backups card, choose Back up now. A green banner gives the new file’s full path, and the backup appears at the top of the list as Manual. Do this before a large import or anything else you might want to undo.
The Kind column gives the reason for each backup: Daily, Before update, Before restore, Before move or Manual.
On the Current database card, choose Check database. CHAX runs SQLite’s integrity check and a consistency check. A healthy file shows “The database passed SQLite’s integrity and consistency checks.” If CHAX reports problems, restore a recent backup or contact support@chax.com.

Backups sit next to the database, on the same disk. To protect against losing the computer, choose Export a copy… now and then, and save the file to a USB drive or another computer. CHAX suggests a name such as chax-2026-10-27.db.

Backups go in a backups folder next to the database. Each name has the date, time and reason, such as chax-20261019-093000-daily.db, so you can tell them apart after copying them elsewhere.
CHAX uses SQLite’s online backup, so a backup is complete and consistent even if someone is printing a check.
Each backup of an encrypted database uses the same key and has its own .key file beside it. The same database password and recovery key open it.
Next to the default database are a few small files for this PC only: license.json (this computer’s license), host.json (host mode settings) and location.json (only if you moved the database or opened another one).
Return your data to an earlier backup, from CHAX’s list or a file you saved elsewhere, and undo the restore if you picked the wrong one.
A restore replaces everything in the current database. Checks, payers, payees, users and settings entered after the backup are gone. CHAX backs up the current data first, so you can always go back.
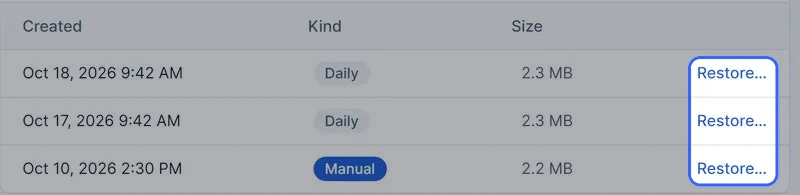
In the Backups list, find the date you want to return to and choose Restore… on its row.
For a backup or export saved elsewhere, such as on a USB drive, choose Restore from file… and pick the .db file. CHAX checks the file before offering to restore it. If it isn’t a CHAX 11 database, comes from a newer CHAX or is damaged, CHAX says so and changes nothing.

If the backup uses a key CHAX doesn’t have, a box appears: This backup is encrypted: its password or recovery key. Type the recovery key, or the database password in use when the backup was made.
Read the red box, which gives the backup’s date, then choose Restore. Nothing is replaced until you do. To leave everything as it is, choose Cancel.

CHAX goes to Home and shows the sign-in screen with “Restored the backup from …”. Sign in as a user from the restored data. If the backup has no users at all, first-run setup opens instead.

| Message | What to do |
|---|---|
| This isn’t a CHAX 11 database. | The file is a database, but CHAX 11 didn’t make it. Pick a file from CHAX’s backups folder or one you exported. |
| The file can’t be read as a database (…) | The file isn’t a database at all, such as a CHAX 10 CHAX.MDB. To bring over CHAX 10 data, read Migrate from CHAX 10. |
| This database was created by a newer version of CHAX. Update CHAX to open it. | Install the latest CHAX 11 on this PC, then restore again. |
| This file is encrypted. Enter the database password or recovery key it was encrypted with. | Type the password or recovery key in the box that appears. |
| That isn’t the password or recovery key for this file. | Use the recovery key, or the password from when the backup was made. |
| The database is damaged: … | The file failed SQLite’s integrity check. Pick an older backup. |
| That is the database CHAX is using now. | You chose the live database file. Pick a backup. |
CHAX opens the file read-only and confirms that it has CHAX 11’s schema, isn’t from a newer CHAX, and passes SQLite’s integrity_check. Only then does it take the Before restore backup.
SQLite’s online backup copies the backup over the current database, and the file stays where it is. A backup from an older CHAX 11 is then upgraded to the current version.
Restored data takes on the current database’s encryption. An encrypted database encrypts the restored data with its key, even if the backup wasn’t encrypted. An unencrypted database decrypts an encrypted backup as it restores.
A restore on a host ends each connected PC’s session with “The host restored a backup of the database. Sign in again.” Otherwise, those PCs might show data that no longer exists. The audit log records the restore.
Have one PC share the company database, then connect the other office PCs to it with an access key so everyone works on the same checks, payers and payees.
On the host PC, open Settings › Host mode. Keep Port at 52780 unless another program uses that port, and choose Share this database.
If Windows asks whether CHAX may use the network, allow private networks.
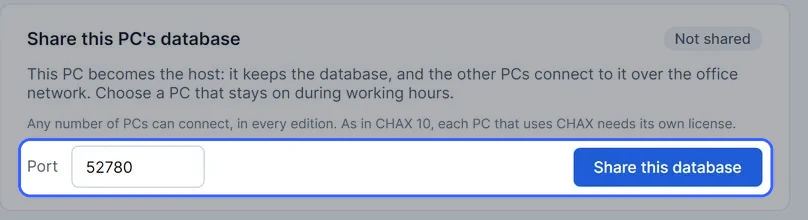
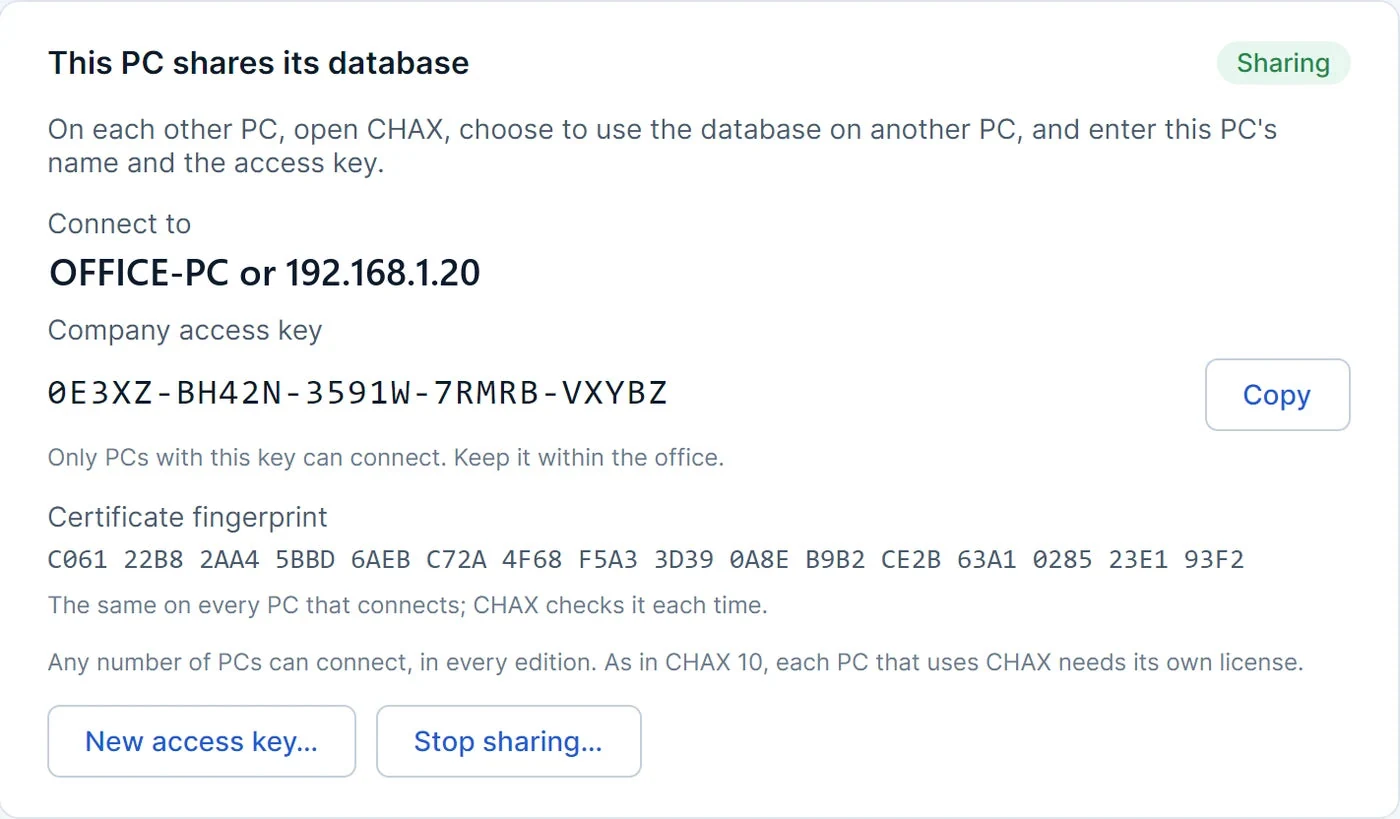
The page changes to This PC shares its database and lists what to type on the other PCs. Connect to gives the PC’s name and addresses, and Company access key gives the key. Choose Copy to copy the key.
The key has 25 letters and digits in five groups. The usual port, 52780, isn’t shown here. Any other port you choose does appear.
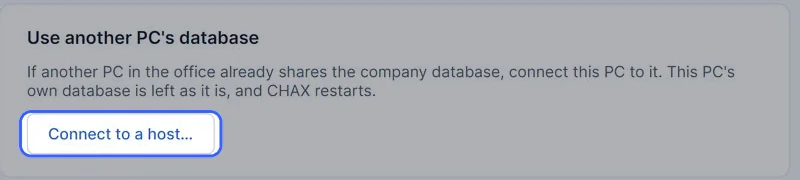
On a new install, choose Use the database on another PC during first-run setup. On a PC that already uses CHAX, an admin opens Settings › Host mode and chooses Connect to a host…. The PC’s own database stays as it is.
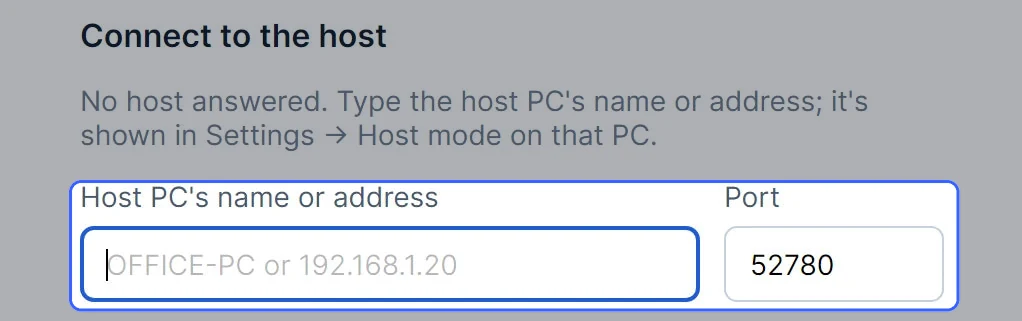
CHAX searches the network for hosts. Pick yours from the list, or type the host PC’s name or one of its addresses in Host PC’s name or address. Change Port only if the host uses a different one. To repeat the search, choose Search again.
“No host answered” means the search found nothing. Typing the name or address still works when the search is blocked.
Type the host’s key in Company access key. Case, spaces and dashes make no difference.

Choose Connect. CHAX restarts and uses the host’s database.

Each person signs in with their own user from the host’s database. Read Users and permissions.
| On the host, shared by everyone | Kept on each PC |
|---|---|
| Checks and transactions, payers, payees, bank routing, the batch, recurring checks, users, the audit log, company settings | Printers, printer setup and check alignment |
| Backups, restores, encryption and CHAX 10 imports, all done on the host | The license, which each PC activates itself |
| The light or dark theme |
If a PC can’t connect, read Host mode connection problems.
The host listens on TCP port 52780, or the port you chose from 1024 to 65535. To find hosts, a PC sends a UDP broadcast on the same port, and each host replies with its name, port and version. Routers and some Wi-Fi networks drop broadcasts, so typing the name or address remains an option. Your firewall must allow CHAX on private networks.
TLS encrypts all traffic between PCs. The host creates its own certificate the first time it shares, and keeps it. The key itself never crosses the network. Each side proves it knows the key, tied to the certificate the client sees, which stops a PC without the key and anyone listening in between. Each client then remembers the host’s certificate fingerprint and checks it on every connection. Both the host and each client display the fingerprint.
Connected PCs request data from the host and never open the database file. The host checks each user’s permissions itself and doesn’t rely on the other PC’s screens.
A connected PC checks in every 30 seconds. After 2 minutes of silence, for example when the PC goes to sleep, the host ends that PC’s session and the PC signs in again. Everyone also signs in again when the host restores a backup or opens another company’s database.
While sharing, the host checks every hour that the day’s automatic backup exists. An encrypted company database is unlocked on the host when CHAX starts there.
Bring your checks, payers, payees, users and license over to a new PC without losing anything along the way.
Go to Settings › Database & backup and choose Back up now. A green banner tells you where the new file is. Copy that .db file to your USB drive.
On Professional or Enterprise, Export a copy… saves the copy directly to the USB drive.

.key, such as chax-20261027-164344-manual.db.key. Without that file, the recovery key is the only way to open the backup.Go to Settings › License. Under Move this license to another computer, choose Deactivate on this computer… and then Deactivate. From then on, the old PC is in trial mode and prints DEMO checks.
The line above the button gives the number of moves you have left.

Install the same or a newer version of CHAX 11. Use the download link in your trial or purchase email. During first-run setup, choose Create a new database and complete the steps. The temporary admin user this creates is replaced when your old users return in the next step.

Copy the backup from the USB drive to the new PC. Go to Settings › Database & backup, choose Restore from file… and pick the file.

Choose Restore. If CHAX asks, enter the database password or recovery key. Then sign in with your user from the old PC. Read Restoring a backup.
Go to Settings › License, type the license code or serial number you used before, and choose Activate. Read Activating your license.

Printer setup and check alignment belong to the computer, not the company. Unless the new PC has the old PC’s computer name, open Printer setup and Check alignment. Print a test page before your first live check.

A new host creates a new access key and certificate the first time it shares. After the move, choose Share this database on the new PC. Then, on every other PC, open Settings › Host mode › Connect to another host… and enter the new name and key. Read Host mode.
| Message | What to do |
|---|---|
| This license is already active on the most computers it allows. … | The old PC still holds the license. Deactivate it there first, or contact support to move it. |
| This license has already been moved 2 times in the last 30 days, the most allowed. … | Wait until the date shown. If you need it sooner, contact support@chax.com. |
| This license wasn’t activated online, so it can’t be deactivated here. … | Contact support@chax.com to move a license activated offline. |
The database file holds everything about your business: checks, payers, payees, users, the audit log and company settings. It also holds printer setup and alignment, saved under each computer’s name, so a new computer starts with its own. The license sits outside the database, in license.json in this PC’s CHAX folder.
Online activation ties the license to one computer through the license server. When you deactivate, the server learns that the computer gave up the license, which frees it for another computer. Each deactivation counts as one move, with 2 allowed in any 30 days.
A restore copies the backup’s data into the new PC’s database file, and upgrades it if it came from an older CHAX 11. The data takes on the new database’s encryption state. An encrypted backup restored into a new, unencrypted database ends up unencrypted, so turn encryption on again if you used it.