Knowledge Base › MultiCHAX 11 › Users and security
Users and security
Control who can sign in and what they can do, and protect the check PDFs you save and send.
Windows2 guides


Knowledge Base › MultiCHAX 11 › Users and security
Control who can sign in and what they can do, and protect the check PDFs you save and send.
On this page
Give each person a sign-in, and set what they may print, their largest check, their default template, and their bank accounts.
Users apply only when sign-in is on. With sign-in off, everyone works as the built-in administrator. Turn it on for every PC on the database in Settings › Secure font and sign-in. See Secure font and sign-in.
Anyone can open Users & permissions. Administrators see all users and can add, change or delete them. Other users see their own record and can change their own password.
Choose Add user. Enter the User name for signing in, with no spaces. MultiCHAX saves it in capitals. Enter a Full name, which Transactions shows as the person who printed each check. Enter a Password twice.

Every user can print checks from the accounting program. These boxes add more.
| Permission | Gives access to |
|---|---|
| Administrator | Bank accounts, check templates, users, settings and removing transactions. |
| Print manual checks (Write check) | Write check, and Use for a new check in Transactions. New users have this on. |
| Print blank checks | Blank checks. |

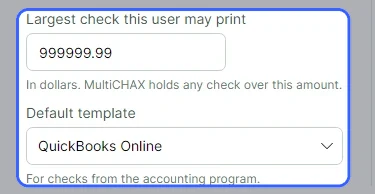
Largest check this user may print is a dollar amount, up to 999,999.99. Any check above it is held. Default template is where Incoming checks starts for this user.
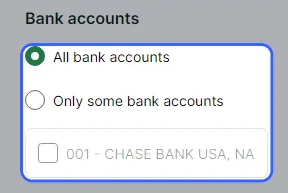
Keep All bank accounts, or choose Only some bank accounts and tick the ones this user may print from.
Choose Save. If you changed your own account, the changes take effect right away.

| Screen | What the user sees |
|---|---|
| Incoming checks | A check above their largest check is held as “Over your $1,000.00 limit”. Checks from a bank account they may not use are also held. |
| Write check | “The most … can write a check for is …”, and the search lists only their bank accounts. |
| Import from PDF | The check is blocked as over their maximum check amount. |
| Transactions | Only checks from their bank accounts. A reprint above their largest check is refused. |
| Sidebar | Non-administrators don’t see Bank accounts, Check templates or Settings. Write check and Blank checks disappear without their permissions. |
To change your own password, go to Change your password. Enter your Current password and the new one twice, then choose Change password. An administrator can give anyone a new password in Edit user and permissions…. Leaving both password boxes empty keeps the current password.
Delete user… ends a user’s ability to sign in, and their printed checks remain in Transactions. You can’t delete the built-in administrator account or the account you’re signed in with.
| Message | What to do |
|---|---|
| The user name can’t contain spaces. | Use a single word, such as JSMITH. |
| There’s already a user called … | Pick a different user name. |
| Choose at least one bank account this user may use, or turn off Only some bank accounts. | Tick a bank account, or choose All bank accounts. |
| Your current password isn’t right. | Enter the password you sign in with today. |
The MultiCHAX database holds users and permissions, so the previous version of MultiCHAX and MultiCHAX 11 share them, and each user’s default bank for each template too.
The Administrator box stays ticked for the built-in administrator account, and for an administrator editing their own account.
This screen has no default bank setting. A user gets a default bank for a template when an administrator links that template to a bank account, or when a new template copies another template’s bank accounts.
Control what people can do with check PDFs, require a password to open them, and pick the folder they’re saved in on this PC.
Only an administrator can change these settings. They cover every PDF of a check: Export PDF… in Write check, Save PDF… in Import from PDF, and Save as PDF… in a reprint. See Save checks as PDFs.
Go to Settings › PDF security and use the boxes under What people can do with the PDF.
| Permission | When to turn it on |
|---|---|
| Print it | When the payee will print the check to deposit it. |
| Copy text and images from it | Keep it off so nobody can copy out the account and routing numbers. |
| Add comments and fill in forms | Only when the payee needs this. Nobody is allowed to change the check itself. |

Enter a Password of up to 40 characters, and people must type it to open the PDF. With no password, anyone can open the PDF, and the permissions above still apply. To see what you typed, tick Show password.

Under Where PDFs are saved on this computer, PDF folder is where Export PDF starts. It stays Documents\MultiCHAX unless you pick another with Choose….

Choose Save PDF security. The next PDF you save uses the new settings.

| Message | What to do |
|---|---|
| Only an administrator can change PDF security. | Ask an administrator to make the change. |
| Enter a full folder path, like C:\Checks\PDF, or choose one. | Type a full path, or use Choose…. |
| MultiCHAX can’t use that folder: … | Pick a folder you have write access to. |
AES-256 encrypts each PDF, details included. Your choices here never allow changes to the pages or the check.
The database holds the permissions and password, so they apply on every PC. The PDF folder belongs to this Windows user on this PC. If the MICR printer is a PDF printer, Incoming checks also saves its PDFs in this folder.
Talk to the support team, or browse all MultiCHAX 11 help.
Contact Support All MultiCHAX 11 Help