How Can We Help?
How to Print Checks from QuickBooks Desktop
Print Checks from QuickBooks Desktop
In QuickBooks Desktop, you use regular checks to pay for a fixed asset, inventory and non-inventory part, service, other charges, and any expense you track. There are two methods for creating an accounts payable check on QuickBooks desktop, it can be through write checks (regular checks) or pay bills. To understand how to print checks in QuickBooks, the image below represents each section and its function on writing a regular check within QuickBooks Desktop. When writing a check, it’s essential to double-check the details entered to avoid any discrepancies. Familiarizing yourself with the various options available can help streamline the process, thereby implementing some quickbooks mistake prevention tips can significantly enhance accuracy in your financial transactions. Always ensure that you save your work regularly to avoid losing any critical data. Additionally, utilizing features like recurring payments and automated reconciliations can also contribute to overall efficiency. Implementing these quickbooks accounting workflow enhancements not only saves time but also reduces the potential for errors in your financial records. By integrating these strategies into your routine, you’ll find that managing your accounts payable becomes more seamless and reliable.
- Bank Account: Account where the money will be taken from.
- Ending Balance: Balance of the given bank account as of the date of writing the checks.
- Pay to the Order Of: Should be the Payee Name or whoever the check was issued for.
- No.: In QuickBooks, the number is assigned depending on the check number preference you set.
- Date: Use the date when you issue the check.
- Amount: Check amount in numbers. Below the Pay to the order field will automatically show the Dollar amount in words.
- Address: The payee address is automatically populated from the payee name setup.
- Memo: This field can be left blank but mostly, it is used as an unofficial note for additional details like the account information, the period, and what the payment is for.
- Print Later: Put a checkmark in the Print Later checkbox if you need to print the check at a later time.
- Expenses or Items tab
- Use the Expense tab to enter shipping charges, liability (in cases of payments for liabilities/loans), and other expenses not associated with any item in QuickBooks.
- Use the Item tab to choose the appropriate item on the drop-down list.
- Select Save & Close.
Method 1: Write Checks
After you entered all necessary information on the check, you have two options to print the check;
- Print – print check now, which is applicable to single printing.
- Print Later – applicable for a batch of checks in one check run.
- After clicking the Print Later check box, you either click Save and Close or Save and New
Method 2: Pay Bills
Bill Payment Check is generated when you select the Pay Bills option in QuickBooks Desktop.
Print checks
- From the Write Checks window, select the Print icon then select:
- Check- To print a single check. When you choose this option, you will be prompted to enter a Printed Check Number.
- Batch – To print multiple checks you marked for Print Later. When you choose this option, you will be redirected to the Select Checks to Print window. Put a checkmark on the check/s you want to print then select OK.
- On the Print Checks window:
- Select the MultiCHAX Virtual Printer x64 as the printer name and Page Oriented (Single Sheets) as the Printer type.
- On the Check Style section, choose Voucher as the Check Style.
- Check and make sure all other settings are correct.
- Select Print.
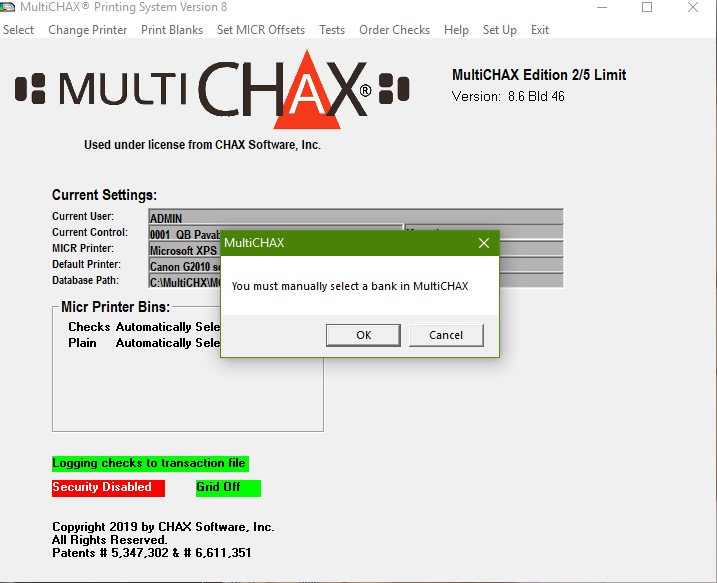
After clicking Print, MultiCHAX Check Printing Software will pop-out on your screen for you to proceed. This intuitive interface will guide you through the necessary steps to customize and finalize your checks. With a variety of options available, you’ll be able to choose the best check printing software solutions that suit your business needs. Once you’ve made your selections, simply follow the prompts to complete the printing process seamlessly. Additionally, if you’re using QuickBooks Online, the quickbooks online multiCHAX setup process is straightforward and user-friendly, ensuring that you can quickly integrate your payroll system with the printing software. Once you’ve completed the setup, you can easily access your customized check templates and enhance your payroll efficiency. Enjoy a hassle-free experience as you streamline your financial operations with these powerful tools at your disposal.
- Click OK to select a bank account
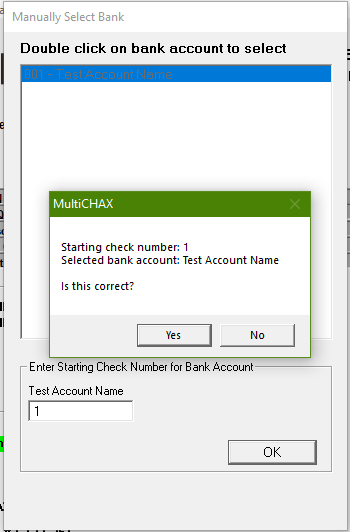
- Double-click the selected bank account and assign the starting check number then click OK.
- Click YES after confirming the correct account and check number.


