How Can We Help?
CHAX User Manual
Introduction
The CHAX software was created to not only accelerate the payment process, but also provide the user with a complete sense of security while this process is occurring. There are times in your business when it is important that you receive a payment immediately; in the past, you were at the mercy of your customers’ standard billing cycles and a host of delivery services. That was until CHAX! Now you can take control of the process and deposit the funds the same day your customer authorizes payment!
CHAX allows you to create a check which can be deposited into your bank account as simply as any check. The United States banking law allows this as long as you have the permission of the payer (the party that would normally issue the check).
NOTE: Although permission may be verbal MBS suggests that you receive specific authorization before creating a check. Use this document to create a proper draft check authorization request.
Your customer can either fax a copy of the check to you or give you the information you need over the phone or through email correspondence, and then have them either file the check away or destroy the check.
NOTE: If this information is provided to you over the phone, make sure to have your customer read to you the check number first and then the MICR numbers on the bottom of the check. You should tell them to mark “VOID –CHAXed” on their copy of a check which they will retain. The payer should retain the original check for his/her records, this original copy should never be deposited.
The key to CHAX is that it prints a check containing the MICR characters, just as they appear on a regular check. The American Bankers Association requires printing in accordance with specific standards, within very tight tolerances. CHAX offers a patented feature that ensures compliance with these tolerances.
CHAX are not allowed to be used for Certified Checks, Bank Teller Checks, or Money Orders.
System Requirements
CHAX requires the following equipment and software:
-
Windows 7, 8, 8.1, 10 (Windows XP and Vista are no longer officially supported)
-
100 MB (megabytes) disk space
-
Minimum screen resolution: 1024 x 720
-
Laser printer with True Type fonts support
CHAX Installation
Installation is quick and easy with CHAX. Before installing CHAX, you should verify that your system meets all requirements. You must make sure you have administrative rights while installing the software. After installation and during normal operation full administrative privileges are not required. Complete the setup instructions on your screen, start CHAX, and you are ready to create your first check.
To install CHAX:
-
Shut down all programs that are running, including disabling virus protection programs
-
Run the download install file
-
Enter your serial number (case sensitive), for demo/trial users: enter “DEMO”
-
Select your destination folder (if using a shared network drive, point the install there)
NOTE: If installing on a shared network drive, you must have full control permissions from the network path you are installing to.
CHAX Setup
Before you start printing checks, you need to do a few things to complete a CHAX transaction.
-
Add your company information (Payee)
-
Select a printer
-
Change your check format
Add Your Company Information (Payee)
This is where you can select which payee to use while creating a check, and add the necessary information for this specific payee to be able to use the ACH feature of CHAX. If you would like to use a payee other than the default payee, then select the payee and click on exit. You will now override the default payee for one check only or you can enter Payees that will be available in the future. This might be used if you are creating checks to be paid for services rendered by your subsidiary.
-
Open CHAX
-
Click on Payee
-
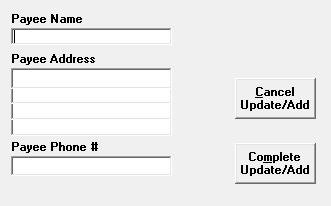
Double click on the Payee Name you wish to edit, or select Add New
-
Enter the check recipient name, address, and telephone number
-
Click Complete Update/Add
-
Exit the Payee screen
Things to remember:
-
You may add an unlimited number of Payees
-
Each Payee should have unique information
-
In order to change or select a payee you must have been assigned rights to do so
Select a Printer
-
Select SETUP from the main menu
-
Select Printers from the Setup screen
-
Choose your check printer, source tray, and click OK
-
Exit the Setup screen
Change Your Check Format
-
Select SETUP from the main menu
-
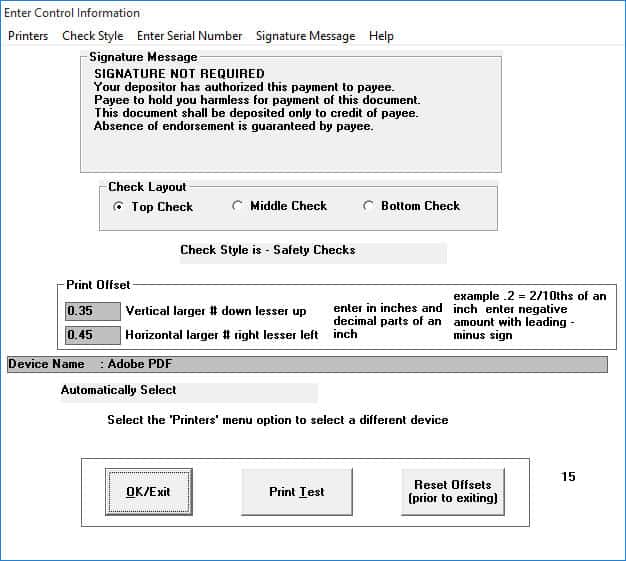
Select Check Style from the Setup Menu (economy – partially pre-printed; safety checks – blank)
-
Select Signature Message and choose from the predefined signature not required notices
-
Select the Check Layout format: top check, middle check, bottom check (CHAX ALO users only)
Maintain Users
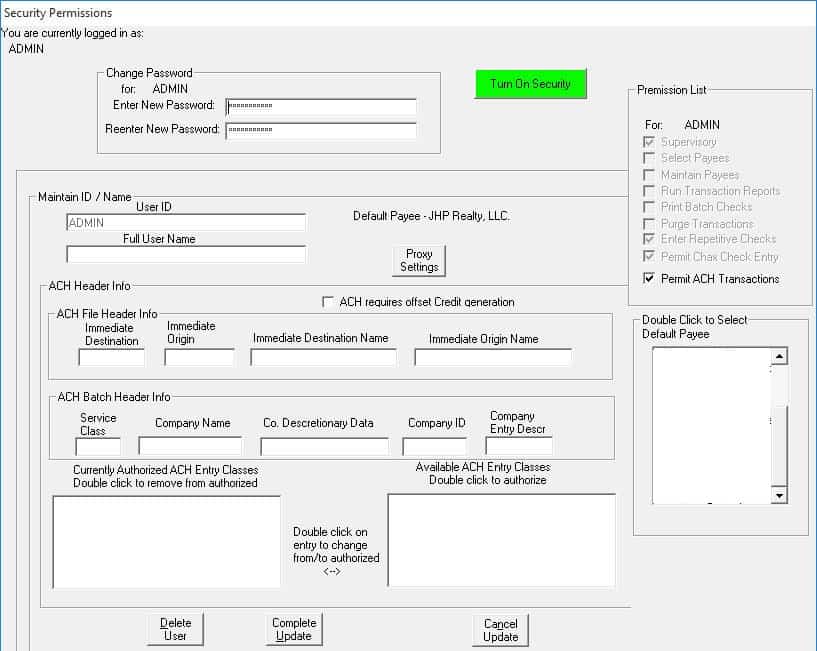
This is where you can manage your users, such as: adding or deleting users, enabling security, restricting certain features for specific users.
default username: ADMIN
default password: MASTERADMIN
NOTE: Once you change your password, be sure to write it down and store in a safe place, or you will not be able to access the CHAX system without entering the proper password. When changing the password enter any combination of letters or numbers (no spaces or special characters). You will be requested to type it again. Only if the first typing agrees with the second will the new password be accepted and take effect. You will only be allowed to change those items that you have rights to.
Add New User
-
Click on Maintain Users
-
Click on Add New User
-
Enter a USER ID (username)
-
Enter the full user name (optional)
-
Change the password (you may leave blank for no password)
-
Configure the Permission List
-
Double click to select a default Payee
-
Complete Update
Change User Password
To change the admin or another user’s password:
-
Click on Maintain Users
-
Select the User ID / Username you wish to change
-
Select Update User
-
Enter a new password
-
Re-enter the new password
-
Complete Update
User Permission List
For each individual user you can assign the rights that would allow them to either participate or not participate in these features:
-
Supervisory: allows the user full access to all privileges in CHAX
-
Select Payers: allows the user to select from all the payers in the database.
-
Maintain Payers: allows the user to edit/delete payers from the database.
-
Run Transaction Reports: allows the user to create transaction reports.
-
Print Batch Checks: allows the user to print batch checks.
-
Purge Transactions: allows the user to purge/delete unwanted transactions.
-
Enter Repetitive Checks: allows the user to create memorized transaction
-
Permit ACH Transactions: allows the user to generate ACH transactions.
-
Permit CHAX Check Entry: allows the user to enter/print a CHAX check.
Entering Checks to Print
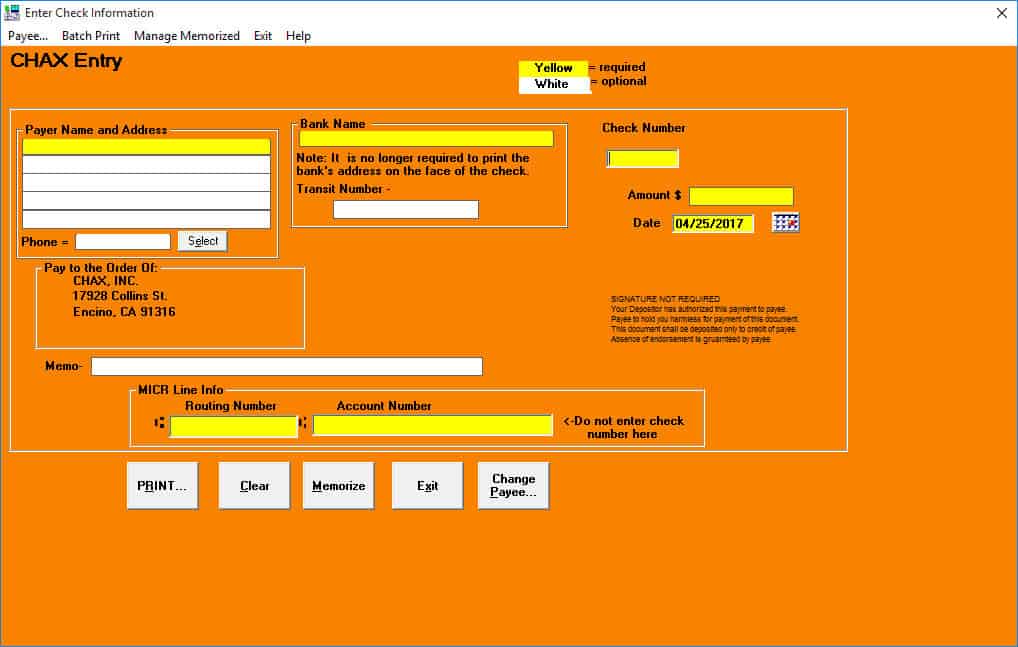
Click on Enter Checks to start entering your customer’s check information.
NOTE: Use the TAB key to move between fields. Use Shift+TAB to go back.
To start printing a CHAX check:
-
Enter your customer’s check number
-
Enter numerical amount
-
Enter the check date to match the original check date
-
Enter the Payer Name, Address, and Phone Number (if the payer already exists, click on SELECT)
-
Enter the Routing Number
-
Enter the Account Number (use – “dash” when necessary)
-
Enter the Bank Name
-
Enter the Transit Number (optional)
-
Enter the Memo line (optional)
-
Click PRINT to print the check now; or click MEMORIZE to create a recurring transaction
To create a batch print:
-
Click on Batch Print from the menu
-
Select “ENABLED?” (a check mark will appear next to “Enabled?” to show that it’s turned on)
-
Enter check information as normal
-
Select “Print to Batch” to save in the batch file
To print the batch file:
-
Click on the Batch Print menu
-
Select Print Batch to print your batch file
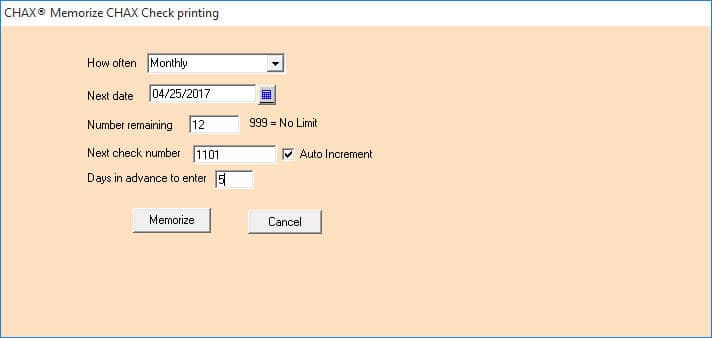
To memorize a transaction:
-
Enter check information as normal
-
Select MEMORIZE instead of Print
-
Enter how often the transaction should be printed
-
Select the next check date to be used
-
Enter the number of remaining transactions (999=no limit)
-
Enter the starting check number (auto increment is enabled by default)
-
Enter days in advance to enter
-
Click Memorize
Transaction Reporter
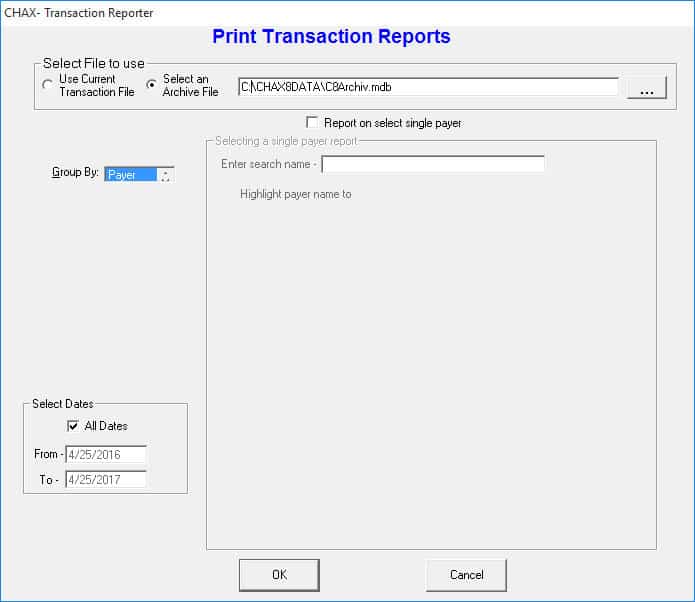
As CHAX checks are produced, an entry for each check is added to the transaction database. The Transaction Reporter is provided for viewing and maintaining this transaction database.
You can select between MULTIPLE transaction databases by using the SELECT AN ARCHIVE button. If you have previously moved some transactions to an archive database, you may select one of those archive files as input to the transaction reporter, or you can use the default Current Transaction File.
You can sort your report by Date, or Payer. To set up restriction guidelines, select which type of transactions to include in the report, as well as, the date range. Click on OK to print a transaction report. The report will first display on a preview screen, then you will have the option to print it.
Archive Transactions
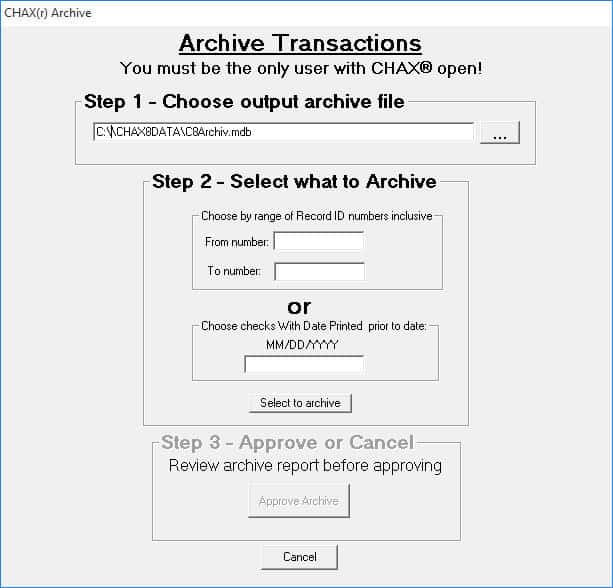
Archiving transactions removes specific transactions from the main database file. You will need to select the transaction record ID numbers you wish to archive, or select by date.
After you approve the archive, you will be prompted to name the archive file.
NOTE: You can “purge” or “delete” duplicate transactions using the Archive Transactions feature.
Best Practices
MICR Toner
MICR (Magnetic Ink Character Recognition) toner is not legally required to produce a valid check. However, the U.S. banking system uses special equipment for reading and sorting check documents that require certain magnetic properties to properly process a check. If you do not use the special MICR toner in your printer, it is possible that the banks will have to add a special additional strip on the bottom of the check which they would manually encode with MICR characters. This costs the bank extra time and thus extra expense. The bank may charge you and or your customer for this extra expense of processing the checks. In some instances, banks have returned such checks unpaid because they were not encoded with MICR toner. If you use special MICR toner offered for sale by CHAX, Inc., (1-800-354-MICR) you will ensure your CHAX checks meet the American Bank Association standards (ANSI X9.27 standard) and thus can be processed by the banks without any additional intervention.
Data File Backup
It is always good practice to regularly backup all the important files on your disks or network drive since you may be saving check batch data for later printing and/or databases of payers and payees, a loss of data could cause considerable inconvenience. We strongly recommend that you review your backup procedures to make sure that the CHAX® files are backed up sufficiently to meet your needs.
Encouraging Customer Use of CHAX
Some of your customers may have questions about the use of CHAX. We suggest that you explain the benefits of using CHAX to send the funds. Use the following explanations as appropriate for an individual situation:
-
CHAX checks are safer than regular checks. When you send a CHAX® check you are providing no more information than if you mailed the check. Checks can be intercepted or lost in the mail. CHAX® are sent by fax and thus you have positive, instant confirmation of their receipt. CHAX® checks look different from regular checks and so cannot be easily cashed but must be deposited into a bank account, leaving an audit trail.
-
You control your money. You control the float. You can send the CHAX® checks on the day you wish to release the funds. You no longer have to build in extra time to cover delays.
-
You can eliminate the need to use expensive overnight delivery service when you have to get a check delivered in a hurry.
-
If you have merchandise on hold for receipt of funds, you can have it shipped the same day.
-
You can avoid COD charges and the problems of having to leave the check ready and waiting for the trucker.
-
Using CHAX checks instead of credit cards will not tie up your credit card’s available credit and will avoid the hassles of getting reimbursed for business purchases.
-
Keep your accounting simple. CHAX checks are generated by you just like regular checks (you create a regular check, fax it, and retain the original for your records). If you use CHAX instead of your credit card, you won’t have to analyze and allocate your credit card account statement for tax and audit.
Sample Draft Check Authorization Request
Here is a sample draft check authorization request that you may copy for your purposes. You will need to replace enter your actual company name to be valid.
